Project Management Toolkit
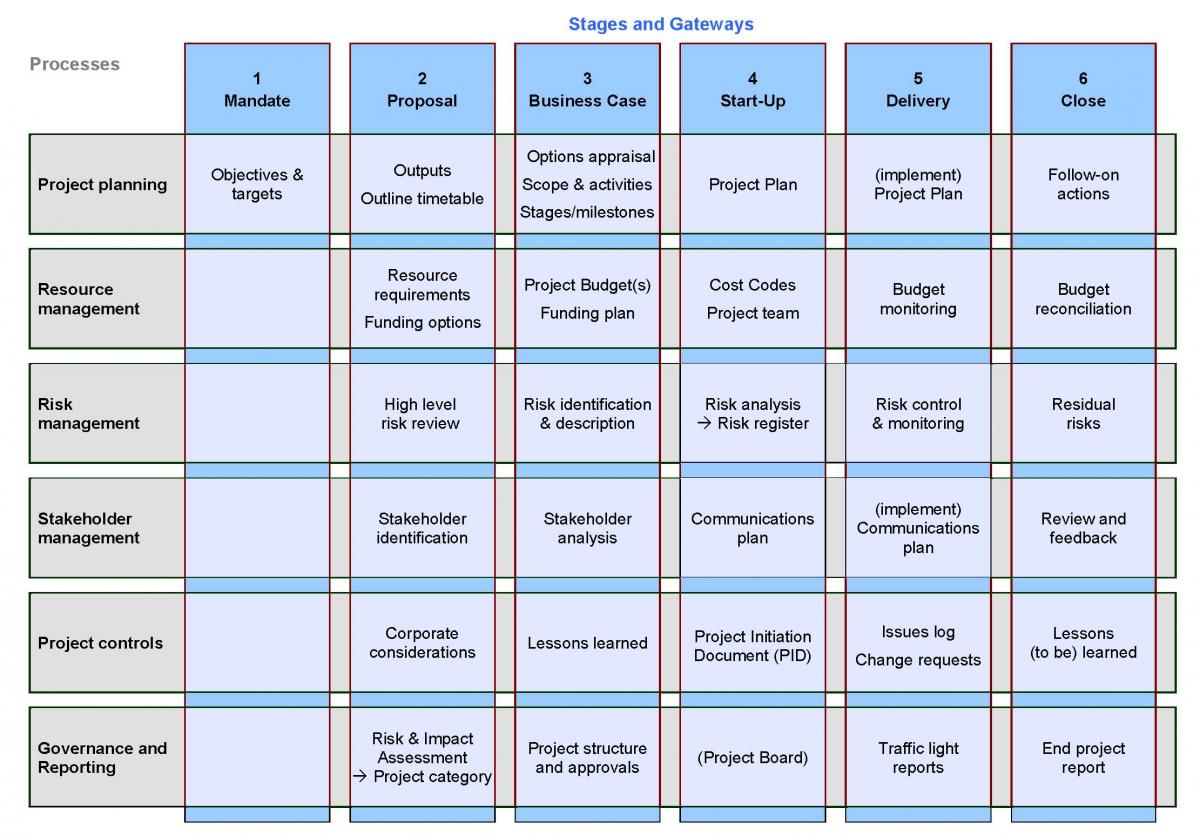
Project Management ToolkitThe following sections provide more detail on the project management processes which run through all of the stages. These are:
- Project planning
- Resource management
- Risk management
- Stakeholder management and communications
- Reporting and governance
- Project controls
There are also sections providing information, tools and templates to help with some of the processes specific to a particular stage. These are:
- Project impact and risk assessment (Stage 2)
- Options appraisal and Value for Money analysis (Stage 3)
The relationship between the project processes and project stages is illustrated below, or you can download this as a word document here.
Communications and Stakeholder Engagement
Communications and Stakeholder EngagementThere are likely to be individual or groups who are not part of the project team, but who will be affected by or interested in the project and can have a powerful influence on its success. Effective communication and engagement with key stakeholders, both internal and external, is therefore essential. This section of the toolkit gives you some advice on how to identify and communicate with those people or groups who have an interest in or influence over the project.
The key elements of communications and stakeholder engagement are:
|
Stage 1 - Project Mandate |
|
|
Stage 2 - Project Proposal |
|
|
Stage 3 - Business Case |
|
|
Stage 4 - Project Start-Up |
|
|
Stage 5 - Project Delivery |
|
|
Stage 6 - Project Close |
You can also think of it as working through a simple set of questions: who, what, why, how, and when? (but don't forget to do and review afterwards).
Stakeholder identification (who?)
A stakeholder is any person, group or organisation who will have an interest in or be affected by the output of the project. This includes people directly involved in the project. You need to understand who your stakeholders are, and make plans for involving them in the right way and at the right time.
The first step in this is to identify potential stakeholders. You might want to involve other people in this process. If you have an idea of who will be on the Project Board or Project Team, you could hold an informal workshop to do this. A key question when identifying stakeholders is: Whose support or opposition might significantly influence the success of this project?
Examples of typical stakeholders include:
|
Internal |
External |
|
Cabinet |
Service Users |
Stakeholder analysis (what and why?)
You have already identified who your stakeholders are, and you will have more information about the project now. So you’re now able to work out the best way of managing the stakeholders.
Stakeholder Analysis is important for two reasons:
- A common criticism of many projects is that stakeholders are not kept informed of changes and developments, which has reflects badly on the project, or causes delays.
- It is extremely rare for all stakeholders to support the changes brought about by the programme or project.
Stakeholder Analysis helps you to address both of these points. If you understand a particular stakeholder’s view of the project, their influence over others and level of commitment then you can target your communications activity. You can make sure you keep people who are positive about the project 'on side', whilst also trying to persuade people who are against it to see the benefits and actually shape the project in to something they can agree with.
The basic steps to the Stakeholder Analysis are:
|
1 |
Start with the stakeholder list you already have and, using the information you now have, refine it or add to it if you need to. |
|
2 |
Identify the point of view of each group. A stakeholder can either be:
|
|
3
|
Identify how interested the Stakeholder is. Again, there are three levels of interest:
|
|
4
|
Identify the influence of the stakeholder. Are they:
|
|
5
|
Using this information, decide the general approach you need to take with each stakeholder. Do you need to:
|
When you come to plan the project in detail later on, you will be able to use this information to scope out any communications activity that you need to do.
Download the Stakeholder Analysis template
Communications planning (how and when?)
You need to plan carefully for how you're going to communicate to all of the people with an interest in the project. This is especially important if you need to convince people of the merits of the project, or if you need to engage or consult with people in the early stages.
Use the Stakeholder Analysis information to determine:
- Who you need to communicate with?
- When do you need to communicate with them?
- What information will they need, or have?
- How will you provide or get that information?
This needs to be brought together into a Communications Plan and included in the Project Initiation Document (PID). You need to plan for three types of communication:
- Regular or standard communications – for example, project boards, newsletters
- Consultation and engagement – this would be a separate product of the project but you should set out the overall approach to this kind of communication
- Reactive communications – how will you deal with the random questions you’re asked, or how will you deal with the press, for example.
On some projects, you might need to create a separate communications workstream.
Download the Communications Plan template
Don't forget that after "Who, What, Why, How and When" comes "Do", It's very easy to develop a beautiful Communications Plan which is approved by the Project or Programme Board and then languishes forgotten in a file. The important part is to carry out the planned engagement and communication activities, and to check the effectiveness of this in informing and involving stakeholders ("Review").
Governance and Reporting
Governance and ReportingReporting
It's important that you keep the Project and Programme Board informed about the progress of the project throughout its life cycle. Timely, well-constructed reports will help the Board understand issues affecting project delivery and enable them to make decisions.
You should only compile a report at logical points to inform on progress or status as necessary. Reporting for the sake of producing a report is only going to add to your workload. As part of the Project Start-Up Gateway, you need to agree with the Programme Manager what reports you need to provide, what they will look like, and when you will provide them. This will partly depend on the project type and category. However, there are two reports that you will always need to produce, regardless of the type of project:
- a periodic Traffic Light Report, which gives an update on progress, risks, issues, budget and decisions required
- an End Project Report, which gives a summary of performance and achievements on completion of a project.
Traffic Light Reports
The purpose of the Traffic Light Report is to provide the Project Director and Project Board with summary of the key aspects of the project. These are:
- Overall status and progress against the plan
- Risks
- Issues
- Budget
Each of these sections should provide a brief narrative summary together with a ‘Traffic Light’ status – red, amber, or green – based on the tolerances you agreed with the Programme Manager at the start of the project.
How often you produce a Traffic Light Report will depend on the size and scale of the project. A monthly update on progress is usually sufficient for most projects and often helps to re-focus your mind on what the issues with the project are and what the next steps need to be. (It’s worth noting here that if you produce a report every month, it doesn’t necessarily mean you have to have a Project Board meeting every month.)
Download the Project Traffic Light Report template
End Project Report
The End Project Report is used to inform the Project or Programme Board that the project has been completed and is ready to close. It contains information on:
- How well the project performed against the baseline PID
- How well the objectives have been met
- Lessons learned
- Follow on actions and a date for a post-project review.
Follow on actions are used to highlight further work that could or should be done once the project has handed over the product to the users. This might include things like:
- Training needs
- Change requests that were rejected but still might be worth investigating
- Project issues that weren’t resolved
- Actions for any future review of the project.
Options Appraisal and Value for Money
Options Appraisal and Value for MoneyOptions Appraisal
The options appraisal is at the core of the Business Case and will typically include:
- The implications of 'doing nothing'
- The options for delivery (note that a series of appraisals might be needed to examine different aspects of project delivery, e.g. type of intervention or procurement route)
- An assessment of the pros and cons for each option (benefits and dis-benefits)
- The potential costs of each option and sources of funding
- A recommended option for both delivery and funding.
You should always compare the options with a 'Do Nothing' option. Doing this helps to answer two important questions:
- Will delivering the project actually make a difference compared with not delivering it?
- What will the impact be if we don't deliver the project?
A Project Definition Workshop is a good way of introducing people to the project as well as carrying out an initial assessment of the project options. The workshop is usually chaired by the Project Sponsor and facilitated by the Project Manager, but you can get advice and help from your Directorate Programme Manager. Before the workshop you should brief everyone involved and give people the project mandate and proposal documentation as background. Lessons learned from previous projects should also be considered as an important input to the process.
The options appraisal is a potentially a time consuming task and you must resist the urge to ‘plough through’ it and get it done quickly without considering the options properly. For a large or complex project, you may not be able to reach a final decision on the options in the space of one workshop, simply because of the amount of information needed to make the decision properly.
Wherever possible, the options appraisal should be quantitative – i.e. with each option given a series of scores to indicate how well it supports each of the project objectives. The project objectives themselves can be weighted, enabling a single evaluation score to be produced for each option. There are several advantages to conducting the options appraisal in this way:
- It ensures that the project objectives are specific and measurable
- It provides a clear record of how each option has been evaluated
- It can easily be reviewed if new options are identified or assumptions change
- It enables a simple Value for Money analysis to be undertaken
(by dividing the evaluation score of an option by its cost).
A simple template for carrying out a quantified options appraisal is attached here. (Please note that there's some rather complicated formatting in this to drive the calculations, which is easy to throw out if you add or delete rows, but anyone from the Accountancy team should be able to put these right for you.)
It's important to note that there are necessarily going to be some fairly crude assumptions involved in allocating weightings and scoring the options. For this reason, the quantified options appraisal shouldn't be seen as automatically generating the answer, but as a helpful way to analyse and evaluate the project options in a transparent, consistent way.
Project Controls
Project ControlsThis section covers:
Issue management
Throughout the lifecycle of your project things will happen, people will ask questions or make requests, and you will need to work out how to respond to them. This is issue management.
An issue is basically a certainty (compared with a risk). It is something that definitely will happen or has already happened, and can have a positive or negative effect on the project. It’s sometimes helpful to categorise issues to make it easier to work out how to respond. There are four categories of issue:
- Question
(What colour will my car be?) - Statement of Concern
(I’m worried that my car will be luminous yellow) - Request for Change
(Can you make the car blue instead of black?) - Off Specification
(The factory doesn’t have any blue or black paint, so we’ll have to paint it white)
Part of your job as project manager is to track issues as they arise and make sure that they are resolved. You either need to decide on what needs to be done, who needs to do it and when it should be done by, or you need to ask the Project Executive or Project or Programme Board for a decision on what needs to be done.
The easiest way of tracking issues is to use an Issues Log. This will record information on:
- The type of issue and what the issue is
- The impact the issue will have on the project
- Who raised it and when
- What action needs to be taken, who’s taking it, and the deadline
- Whether the issue has been resolved and closed
Using an Issues Log to keep track like this means that you don’t forget about issues, and if issues come up again and again you have a record of how they’ve been resolved. (This also will form an important part of the Lessons Learned at the close of the project.)
Download the Issues Log template
As with the Risk Register, it’s important to take time out to keep the Issues Log up to date.
Change Control
It is almost inevitable that something will change during the life of the project. The Change Control process allows you to track these changes by ensuring that all proposed changes are recorded, and assessed to work out the impact they will have on the project.
Having a formal process allows the project manager to ensure that the scope of the project does not gradually 'creep' outwards over time. It also allows the Project Board to make sure that where changes are approved, they don't reduce the viability or value of the project.
The Change Control process is fairly simple:
|
1. |
All change requests should be recorded by the Project Manager, with key information such as:
|
|
2. |
If the change is within the agreed tolerances, it can be approved by the Project Manager. Any change requests that go beyond these tolerances should be referred to the Project Board require the approval of the Programme or Project Board are escalated to the Board and discussed as part of the Change Request Report |
|
3. |
If the change is approved, the relevant documentation will be updated to reflect the change and the Action Owner will then complete the appropriate actions to carry out the change |
Version Control
All projects produce documents and files, either as a hard copy or electronically. To keep track of documentation you should establish version control at the start of the project. This will make sure all stakeholders can easily identify the most up to date (current) version of any document. The version number also identifies whether a document is a draft or final version.
The following is a common way of establishing version control:
|
Version |
No. |
Description |
|
First Draft |
0.01 |
Use a zero to show that the document hasn't been signed off. The number after the decimal is the version number for the draft. |
|
First Approved Version |
1.00 |
Use a whole number to inform the reader that this is a signed-off version. |
|
Latest Approved Version |
2.00 |
The highest whole number is the latest signed-off version. |
|
Working Copy |
2.06 |
Use a whole number and a decimal to inform the reader that version 2 is the latest signed-off version and that there have been 6 subsequent drafts. If version 2.06 were to be signed off, it would become version 3.0. |
Project Management Toolkit
Project Management ToolkitDefining products and tasks
A good way of developing a project plan is to start with the final 'deliverable' of the project and work backwards, breaking it down in to the different components that will combine to create it. These components are the products and the process of doing this is called Product Based Planning.
A product is basically anything that the project uses or creates. There are two basic types of product:
- Input: Things that are brought in to the project. For example, if you are designing a training programme and buy an off-the-shelf e-learning package, this package would be an input.
- Output: Things that the project creates. For example, if you designed the e-learning package within the project, it would be an output.
- Outcomes: Benefits the project delivers. For example, apprenticeships.
The process of product-based planning is summarised below:
Step 1: Identify the Products
The outputs of the project will be detailed in the approved Project Proposal, so you should start with this and work backwards, thinking through all the things that will need to be done or put in place (inputs) to deliver these outputs. These are the products. Then break each product down to a sensible level that can easily be managed. For example, if you needed to develop a document, you probably wouldn’t need to break it down further and identify each chapter heading.
Once you’ve done this, it can be useful to draw them out in a diagram. As you do this, you might find that you can group products together. For example, if one of your end products is a training package, made up of a training programme, trained trainers, e-learning products and so on, you can group all of these together into a workstream. You can then package up these workstreams and hand them over to a specific person or group to manage.
Step 2: Identify the Product Flow
Once you have the products broken down, you need to work out the order they need to be completed in. This might be as simple as starting with the smallest products you identified and working up to the final product. In most projects, however, it won’t be this simple. Some things will need to be done before others or at the same time so you need to work this out. This is sometimes called the Product Flow, or may also be called the Critical Path. You can use this information to identify what tasks need to be completed in order to produce the products, and set out the milestones of the project. In other words, you can complete the project plan.
Most projects use a Gantt chart for this. The Gantt chart (named after its inventor, Henry Gantt) is form of bar chart - which illustrates the key tasks, when they will be carried out, and the relationships between them, as illustrated here (click on the image to open up a larger version).
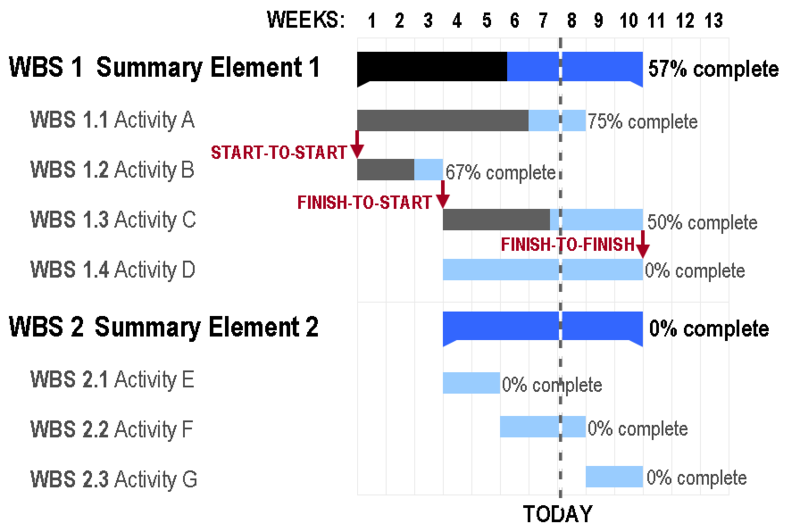
For many projects, a simple Excel template will be all you need for this, but for large or complex projects, it may be better to use Microsoft Project for the project plan. This will take longer to set up, but will enable you to automatically update the timetable depending on whether tasks take longer or shorter than predicted. MS Project can also help you in more sophisticated project planning if needed, such as allocating resources to tasks and tracking the % completion of activities. If you don't know how to use Project or don't have access to it on your system, contact your Directorate Programme Manager for advice.
Project plan (GANTT chart) template in Excel
Identifying project stages
Depending on the type of project you have you might be able to plan the entire project in one go. For more complex or long term projects it might be helpful to use formal stages and plan one stage at a time in detail.
Stages can be a useful planning tool in a number of situations:
- In projects with a long timescale, where you can’t accurately plan beyond a certain time horizon
- In very complex projects, where it is simply more sensible to focus on one stage at a time
- In projects where key decisions will affect how all or part of the rest of the project is delivered or managed, or even if they are delivered at all
- In projects where different parts of the project will need different people to be involved at different times, or managed in a different way
- As a way of making sure that the Project Board regularly review progress against the baseline and check that the business case is still viable, worthwhile and deliverable.
A stage is simply a distinct group of activities and products that is managed as a discreet ‘subset’ of the overall project plan. Each stage will have:
- a clear set of products or activities
- a finite lifespan
- dedicated resources both funding and people
- an appropriate organisational structure.
When developing the Project Plan, you agree the ‘high level’ milestones. These key dates give you a framework to work within that allows you to plan the tasks and activities of one stage at a time in detail.
Project Risk and Impact Assessment
Project Risk and Impact AssessmentThe project category indicates what approval and monitoring the project is likely to require. Completing the Risk & Impact Assessment section of the Gateway 2 template will provide the following information, on the basis of which a simple assessment matrix can be used to identify the project category:
- Estimated resource requirement
- Proposed funding source(s)
- Involvement of partner organisations / stakeholders
- Timescale
- Links & dependencies
- High level risk review
The Project Risk and Impact Assessment Matrix attached here is based on a tool developed by Sheffield City Council. It is very similar to the matrix developed by the Change & Improvement Team during 2008 and subsequently used by the E&R Programme Office.
Download the Project Risk and Impact Assessment template
Note that this matrix is provided as a starting point only, and may need to be tailored to the needs of different programmes. For example, in large capital programmes, the thresholds for cost and timescale might be need to be increased significantly; whereas for other programmes, they may need to be reduced, or other evaluation criteria included. For further information, contact your Directorate Programme Manager.
Suggested project categories relating to the risk and impact assessment score are as follows:
|
Project Risk and Impact Score |
Suggested Project Category |
|
100+ |
A |
|
50-99 |
B |
|
25-49 |
C |
|
0-24 |
D |
Remember that this is all about identifying the right level of approvals and monitoring for the project, so it will always be necessary to apply an element of common sense alongside the risk and impact assessment score. Your Directorate Programme Manager will be able to advise, and will make the final decision on the project category.
- Category A projects (high risk, high cost, high impact) require a project board and will be monitored by the Project Review Group (in addition to the Programme Board). Theme Boards may also be involved in gateway approvals.
- Category B projects will also be monitored by the Project Review Group, but do not require a separate project board.
- Category C projects will be approved and monitored by the Programme Board only
- Category D projects will be approved by the Programme Board, but ongoing monitoring will be by divisional management teams (as part of “business as usual” delivery, such as the Local Transport Plan investment programme), with reporting to the Programme Board by exception only.
Resource Management
Resource ManagementResource Planning
As part of the Business Case, you will need to complete a Financial Analysis spreadsheet for revenue and (where applicable) capital costs of the proposed project. Your Directorate Finance Lead will be able to help you with this if needed:
- Adult & Culture Services – Anna Snowdon
- Children’s Services – Anthony Francis
- Chief Executive’s Directorate – Julia Vince
- Environment & Regeneration – Karen Brown
The revenue costs must include the new/additional costs and savings that occur due to any capital investment. For example, for a project to extend a sports centre, the capital costs would show the capital cost of the building work; the revenue costs/income would show the additional rent/repair/heating/lighting due to the increased building; and the funding would show the additional sales due to the new facilities for the public.
The funding of the net revenue costs must also be identified (i.e. grants or identified revenue budgets) and any revenue savings should be shown. For example, a capital investment energy saving scheme that costs £100k will reduce heating costs by £200k. The £100k would be shown as capital costs and the £200k as a revenue saving.
If a project is getting Prudential Borrowing, you must identify the revenue savings and/or additional income that occur due to the capital investment. This will allow the Incremental Impact Indicators to be calculated as part of the Prudential Indicators reported to Cabinet.
Whole Life Analysis
Make sure that you have considered how much the scheme is going to cost throughout its whole life. You need to think beyond the initial cost associated with establishing the programme or project or the construction phase, but think about how much the facility will cost throughout its lifetime. There needs to be the foresight whilst developing and costing a programme or project to establish the lowest cost for the whole life rather than focusing just upon the initial delivery of the facility.
Here is an example to demonstrate this concept in simple terms:
- Option one – a new community centre can be built at a cost of £500K and will cost £200K per year to maintain and run.
- Option two – a new community centre can be built using a more sustainable and energy efficient construction. This will cost £1m to build but £100K per year to maintain and run.
If the community centre is expected to last 10 years then option two will actually be the cheaper option, despite having a greater upfront cost. Option one will have a whole life cost of £2.5m as opposed to option two's whole life cost of £2m. However, these figures do not take into account discounting (adjusting the value of costs and benefits which occur in the future so that they can be assessed in terms of present day prices). The whole life cost needs to be expressed in total cash and net present value (NPV) terms.
The whole life analysis quantifies the cost in full capital and revenue terms for the life of the programme, project or asset. For example, the whole-life costs of a facility are the costs of acquiring it (including consultancy, design & construction costs and equipment), the costs of operating it and the costs of maintaining it over its whole life through to its disposal.
You should be prepared to consider higher costs at the design and construction stages in the interests of achieving significant savings over the life of the facility. It is essential to consider long-term maintenance very early in the design stage; most of the cost of running, maintaining and repairing a facility is fixed through decisions taken during the early part of the design process.
In addition, you should examine the quality or outcome components of service delivery. For example, additional capital expenditure on a scheme may not save money over the life of a building but could reduce the impact on the environment or increase service performance. A whole-life decision may be to increase future expenditure over the life of a building to promote quality outcomes. Every proposed scheme will introduce a number of quality vs. cost questions that should be evaluated and considered over the longer term.
The accuracy, detail and level of technical expertise required to produce this information will vary depending on the capital value of the programme or project. Officer and technical advisors both internal and external will have to make a number of assumptions. You need to submit these so they can be properly assessed.
Staff and Specialist Support
You will also need to consider the staff and specialist support resources required to deliver the programme or project, for example a full time project manager or administrative support. Detail any technical expertise that will be needed from Council officers or external advisers. The cost of this will have to be calculated and included in the Financial Analysis.
As the appointment of external technical advisors represents a real cash flow to the Council, it will be necessary to gain approval from the Head of Programmes and Major Projects before any order is placed. This will help control costs in this area and minimise any unnecessary expenditure. The method of funding these costs will also have to be identified.
Managing the money
Once your project it underway, it goes without saying that you will need to monitor the project’s finances. It doesn’t matter whether you’re managing a small project to develop a strategy or a complex regeneration scheme; you need to keep track of:
- Expenditure so far and how it compares to the budget profile in the PID
- Forecast spend
- Project cash-flow and income
- Actions to address under or over spend
- The project's resources – including people
You might need a person on the project whose job it is to do this, or you might be able to do it yourself. Either way, you need to develop a way of tracking your budget - an Excel spreadsheet is probably the easiest, and again, your Directorate Finance Lead (or for larger projects, the Finance Specialist assigned to the project) will be able to help.
Risk Management
Risk ManagementAn introduction to risk management
A risk is something that might happen. It’s an uncertainty that might be good or bad for the project. An example of a “bad” risk might be a change in government policy which would mean an important government grant was withdrawn. A “good” risk is an opportunity. So a change in government policy might raise the profile of the project and provide access to an increased grant. This section focuses on mainly on managing risks that are likely to have a negative impact on the project, but it’s important to keep the flip side in mind as well.
Risk management helps you to do two things:
- Reduce the likelihood of a risk occurring
- Minimise the impact it will have if it does happen.
There are four steps in the risk management process:
- Identify
- Analyse
- Control
- Monitor
The process is cyclical, as new risks may emerge at any point of the project lifecycle, and existing risks will need to be constantly reviewed and re-evaluated. However, the risk management steps can be broadly mapped against the project stages (and their associated gateways) as follows:
|
Stage 1 - Project Mandate |
|
|
Stage 2 - Project Proposal |
Risk identification |
|
Stage 3 - Business Case |
|
|
Stage 4 - Project Start-Up |
Risk analysis |
|
Stage 5 - Project Delivery |
Risk monitoring and control |
|
Stage 6 - Project Close |
Risk identification
It’s important to understand the potential risks to a project before making a decision on whether to go ahead with it. This step will help you to understand what those risks are so that, if the project is approved, you are more likely to be able to keep them under control.
Tips for identifying risks:
- Involve other people in the process. For example, if you have an idea of who will be on the Project Team or Project Board, you could hold an informal workshop with them.
- Use the information you’ve gathered so far and brought together in the project planning documentation to think about:
- threats that may prevent or delay the achievement of the project’s objectives
- opportunities that might help to achieve the objectives, or even exceed them.
An initial review of the potential risks associated with the project will be carried out as part of the Risk and Impact Assessment at stage 2 (project proposal). At stage 3 (business case) you need to build on this to compose the risk description. This describes the potential risk (what might happen) as well the impact (what the effect would be if it did). You might already be familiar with this way of writing a risk:
There is a risk that <risk> may happen, as a result of <cause>, leading to <impact>.
Where possible try to quantify the risk as well. This will make analysing the impact of each risk easier. So you might write a risk as:
There is a risk that government funding is withdrawn [the risk] as a result of a change in policy [the cause] leading to a 10% cut in the overall project budget [the impact]. This would mean the loss of funding for one workstream manager on the project team and would extend the project duration by 6 months [quantifying the risk].
Once you have identified all the risks you can at this point, you should record them on the risk log. If possible, also summarise any controls (which will reduce the likelihood of the risk occurring) and mitigation (which will reduce the impact of the risk if it does occur), but you will be analysing these in more detail at the next stage.
Download the risk log template.
Risk analysis
You’ve already identified your risks so when you have more information about the project you can work out how big the risks are and how we can control them. You should involve the Project Team and Project Board (if you have one) in this process, usually in the form of a risk workshop during the project start-up stage.
The risk workshop is usually led by the Project Manager, but you can get help or advice from the Directorate Programme Manager and Risk Management Unit. By the end of the workshop, you will have developed a comprehensive risk register for your project.
Before the workshop you need to agree what the risk tolerances are. A risk tolerance is sometimes called a ‘pain threshold’ and is used to identify how much of an impact the Project or Programme Board will allow a risk to have before taking action.
We usually define risk tolerances in relation to four categories:
- Meeting the project objectives
- Impact on service delivery
- Finance
- Reputation.
For each of these, you need to decide how big an impact you are prepared to tolerate, using four levels – Negligible, Low, Medium or High. There is a standard risk tolerance table included in the Risk Register template, but you might need to tailor this to suit your specific project.
A simple example of a financial risk tolerance could be:
- Over/underspend of less than 10% has a low impact
- Over/underspend of 10-25% has a medium impact
- Over/underspend of more than 25% has a high impact.
At the risk workshop you should:
|
1. |
Review the list of risks you've already identified and recorded on the risk log. Are there any new ones? Can any be removed? Copy the risk desciption into the risk register, clarify the type of risk and assign a risk owner. |
|
Then for each risk: |
|
|
2. |
Identify the current controls: What is being done to control the risk already, and is this adequate? |
|
3. |
Decide how likely it is that the risk will happen: Is it unlikely, plausible, possible, or probable? |
|
4. |
Use the tolerance table to decide how much of an impact the risk would have if it occurred. |
|
5. |
Calculate the current risk level, which is determined by the likelihood and impact. This shows you which risks are the most important and should be addressed first. (The spreadsheet will do this for you automatically, but the categories are shown in the table below). |
|
6. |
Identify the target risk level, based on the risk tolerance and the opportunity to improve the risk controls (Some risks will always have such a big impact if they do occur that it will not be possible to reduce the risk level below amber.) |
|
If the current risk level is either Red or Amber, and you decide that the current controls aren't adequate: |
|
|
7. |
Decide what additional actions are required to reduce the risk to the target level, assign someone to take that action and set a deadline. |
Once you've done this, you have all the information you need to complete the project Risk Register.
Download the Risk Register template
|
|
|
Impact |
|||
|
|
|
Negligible |
Low |
Medium |
High |
|
Likelihood |
|
1 |
2 |
3 |
4 |
|
High |
4 |
4 |
8 |
12 |
16 |
|
Medium |
3 |
3 |
6 |
9 |
12 |
|
Low |
2 |
2 |
4 |
6 |
8 |
|
Negligible |
1 |
1 |
2 |
3 |
4 |
Risk control and monitoring
There are two elements to controlling and monitoring risks when the project moves into its delivery stage:
- Managing existing risks
As part of the risk analysis you identified actions that needed to be taken to reduce the risk. Part of your job is to make sure these actions are completed, and then re-assess the risk to see if it’s had an effect, following the process you went through before. Of course, you might not be able to reduce the risk and you may have to accept that the risk will remain. - Identifying emerging risks
Risk management isn’t a one-off “tick box” exercise. Risks and opportunities might present themselves at any time. Part of your job, and the Project Team and Board, is to ‘scan the horizon’ to identify these. But remember that neither you nor the Project Board has the monopoly on identifying risks. Anyone can identify a risk, and they should all be logged and analysed.
It’s easy in the hustle and bustle of managing a project to forget to keep the risk register up to date. It’s absolutely essential to effective project management that you take time out to do this, especially in advance of Project and Programme Board meetings in order to identify any risks that might need to be highlighted to the Board or escalated to the next level for advice or assistance.
Stage Reviews for projects in delivery will also provide an opportunity to review the risk register in detail.